
Guides
Prism Siege: movement first, upgrades next
Find your footing in Zarocer’s geometric survival game. Learn the controls, build useful upgrade combinations and resume your run.
October 8, 2026 · ZarocerRead guide
Read Circle TD’s closed circuit, surviving enemies and upcoming waves. Learn how to evaluate tower coverage, targeting and upgrade decisions.
By Zarocer · October 11, 2026 · 8 min read
Circle TD does not ask you to defend a simple road with one entrance and one exit. Enemies circulate around a closed path. Completing another lap adds corruption and increases the circuit's load, so an enemy that survives remains part of the tactical problem. This makes coverage and the timing of new waves particularly important. More enemies on the board are not merely a busier version of an unchanged situation.
The published Zarocer build offers a twelve-chapter campaign, a sixty-round classic match, endless defense and a daily challenge. It includes gemstone towers, upgrades, targeting choices, abilities, specializations and relics. This guide concentrates on evaluating coverage and timing. For an introduction to opening the game, selecting a mode and returning to a saved defense, use the separate getting-started guide. Neither article promises a single build that wins every chapter or wave.
Inspect the full circuit and identify where a tower could cover several parts of the route. A placement near a bend can expose enemies for a different length of time than a placement beside one straight segment. The useful question is not simply whether the tower's range circle touches the road. Ask how long an enemy is likely to remain inside that range and whether the position covers another segment later in the lap.
The combat screenshot shows a rectangular route with towers near the lower corners and enemies on other sections. It is a diagram to read, not an endorsed optimal layout. Trace the path and compare each tower's visible reach with the enemy positions. You can learn something from an imperfect arrangement without copying it. A screenshot cannot establish the tower levels, the next wave's traits or every choice made earlier in the match.
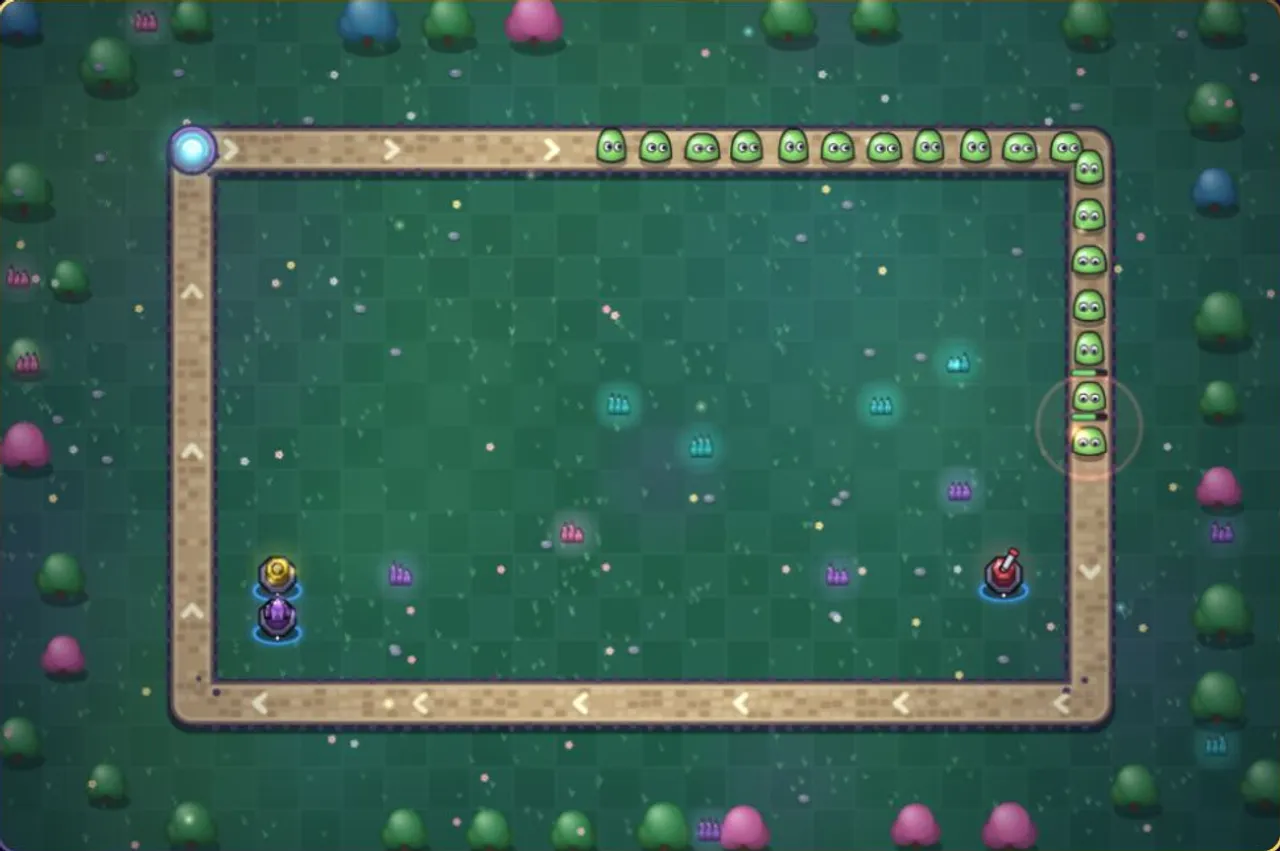
A tower with an attractive damage statistic is not automatically useful everywhere. It must have a suitable target within range and an opportunity to apply that damage. Compare its role with the enemies that survive longest. Are they passing through the defended section too quickly, remaining outside it, or resisting the kind of attack you rely on? These possibilities suggest different responses, so avoid treating every rising load as proof that you simply need more copies of the same tower.
Use the native information panels to compare the available towers rather than substituting invented statistics. This guide does not assign undocumented multipliers or claim that a named tower is universally superior. A useful decision can be explained in terms of a visible problem: extend coverage over a weak segment, support a role that is missing, or improve a tower already doing effective work. That explanation is stronger than buying an upgrade because its button is available.
When a wave becomes difficult, follow a few enemies that make another lap. Their continued presence is evidence about where the defense is failing. Check whether several different enemies survive or one trait appears repeatedly among them. The upcoming-wave interface provides further context. Combine what you see now with what is scheduled next instead of making a purchase based solely on how crowded the board looks at one moment.
Circuit load gives you a reason to pause and reassess the rhythm of the match. Calling another round introduces a new demand while existing survivors still matter. Do not assume that the next-wave button is a recommendation to press it immediately. It is a control. The better moment depends on the present load, the defense you have built and the next wave's displayed properties, not on a fixed number of seconds recommended for every match.
Before upgrading, identify what the tower is already achieving. If it reliably attacks the enemies you need removed, improving it may strengthen a useful position. If it barely interacts with the important survivors, the upgrade may leave the same coverage problem in place. A larger statistic does not repair a location that is poorly matched to the route unless the actual upgrade changes the relevant limitation.
Use a simple comparison while practising. Keep the mode and broad approach similar, then change one placement or one upgrade decision. Watch whether the same type of survivor still completes another lap. This is not a controlled scientific benchmark, but it is a clearer way to learn than changing towers, speed, abilities and wave timing together. If everything changes, you cannot tell which decision helped the defense recover.
The native targeting control gives another way to investigate the defense. A tower's selected target influences which enemy receives attention while several are in range. Read the options shown in the current build, then choose the behavior that fits the problem you can observe. Do not assume that the first option is always ideal or that every targeting label means the same thing across different tower-defense games.
On desktop, the documented shortcut T changes targeting and U upgrades the selected tower. Those keys are useful only when you know which tower is selected. Check the panel before applying a rapid series of shortcuts. On a touchscreen, the visible buttons are the relevant interface. A correct tactical idea can still produce the wrong result if it is applied to a different tower from the one you meant to adjust.
Circle TD exposes abilities with Q, W and E shortcuts, and F changes speed. Faster playback changes how much real time you have to observe and react, even though it does not replace the need for a sound defense. Use a manageable speed while studying a new enemy trait or placement. Once you understand the interaction, you can decide whether faster playback is comfortable for that stage of the match.
Treat an ability as part of a particular situation rather than a substitute for observing the circuit. Read its current native description and consider the enemies it can affect. This guide intentionally avoids undocumented cooldowns, damage values or promises of permanent coverage. Space pauses the game, which provides a practical opportunity to inspect your position. Pressing more controls quickly is not the same thing as addressing the reason enemies continue surviving.
Classic offers a defined sixty-round structure, while the campaign organizes play into chapters. Endless defense has no fixed final round. These formats create different expectations for the length and purpose of a session. If you are learning a coverage pattern, choose a mode you understand well enough to recognize its early demands. Switching to a longer mode does not automatically provide a clearer comparison of the decision you want to test.
The daily challenge is another native mode, not evidence that public portal rankings are active. Keep game records and portal competitive systems separate. Likewise, local seats and AI allies do not mean an online match is available. The current standalone build can configure up to four local seats, but a strategy discussion with another person sharing the device is different from joining a remote multiplayer lobby.
When the main menu offers Continue match, use it to return to the saved defense. Local progress depends on the same browser and Zarocer domain with storage available. Opening the game on another portal or device does not automatically move that defense. A favorite helps you find the game page; it is not a copy of tower positions, upgrades or campaign progress.
Before clearing browser data, consider whether there is a match you want to keep. This guide does not recommend manipulating saves to compare outcomes or altering competitive records. You can learn from the existing board by observing load, reading panels and trying normal gameplay decisions. Respecting native continuation is part of keeping a useful practice session intact, especially when a longer match has accumulated information you do not want to lose.
Before calling a round, ask which enemies are surviving, where they remain outside useful coverage, what the next wave introduces, and which single adjustment addresses that problem. These questions are deliberately more specific than “Do I have enough towers?” They make it possible to connect your next purchase or targeting change to something visible. If you cannot answer them, pause and inspect the circuit before adding another demand.
Open Circle TD's game page for the published version and current controls, then use its native guide for tower-specific details. Read the getting-started article if you need help with modes and continuation. The strategy here is a way of evaluating decisions, not a guaranteed build order: coverage must fit the route, upgrades must fit the problem, and wave timing must account for enemies that are already circulating.
Find your footing in Zarocer’s geometric survival game. Learn the controls, build useful upgrade combinations and resume your run.
October 8, 2026 · ZarocerRead guideA practical first stop before defending the Circle: explore the native guide, choose your mode and return to a saved match.
October 8, 2026 · ZarocerRead guideUnderstand what a favorite saves, how Continue Playing works and why game progress stays with your browser.
October 8, 2026 · ZarocerRead guideUse the game’s supported devices, touch controls and screen orientation to make your next mobile session more comfortable.
October 8, 2026 · ZarocerRead guide
Compare Nonogram Atelier, Hitori and Futoshiki through worked deductions, real controls and different rules. Choose your next logic puzzle on Zarocer.
October 11, 2026 · ZarocerRead guide
Plan the gap, protect solved rows and handle the final tile pairs in Zarocer’s 15 Puzzle. A practical sliding-puzzle strategy with a real board capture.
October 11, 2026 · ZarocerRead guide
Look beyond the biggest flip in Reversi. Understand corners, mobility, frontier discs and endgame decisions with the playable Zarocer version.
October 11, 2026 · ZarocerRead guide
Practise Target Archery by separating wind correction from draw timing. Use the repeatable tournament, read both wind axes and compare your shots.
October 11, 2026 · ZarocerRead guide
Search the center letter, understand the seven-letter bonus and use the curated answer list in Zarocer Letter Hive. Includes practical examples.
October 12, 2026 · ZarocerRead guide
Learn how errors affect Typing Speed Race scores, read characters per minute correctly and compare practice attempts under consistent conditions.
October 12, 2026 · ZarocerRead guide
Find precise families in Word Quartets, check overlapping concepts and interpret near-miss feedback without wasting your four mistakes.
October 12, 2026 · ZarocerRead guide
Plan legal book transfers in Shelf Sorting. Read exposed symbols, protect working space and use a concrete sequence to uncover a new empty shelf.
October 12, 2026 · ZarocerRead guide
Learn the opening removals, straight capture chains and legal landing spaces in Zarocer’s 6×6 Kōnane. Plan for your next jump, not a capture score.
October 12, 2026 · ZarocerRead guide
Trace legal loop captures in Zarocer Surakarta, identify blockers and compare landing positions. Includes Beta status and digital-rule boundaries.
October 12, 2026 · ZarocerRead guide
Understand banking, hot dice and one-die risk in Zarocer’s solo Farkle: ten turns, a 5,000-point goal and no straight or pair bonuses.
October 12, 2026 · ZarocerRead guide